Archive for the ‘ Popular ’ Category

The easiest, most effective way to secure WordPress Sites

WordPress Site security : How To Avoid hackers

1. Place the below on functions to hide WordPress version.
function remove_wp_version() {
return ”; //returns nothing, exactly the point.
}
add_filter(‘the_generator’, ‘remove_wp_version’);

2. Activate the plugin Better WP Security and configure it.

3. Change folder permission
For Directories:  755
For Files: 644

4. Protect config file on htaccess
php>
order allow,deny
deny from all
</Files>

5. No directory browsing. Add the below code on htaccess
# directory browsing
Options All -Indexes

6. Prevent Access To wp-content
Order deny,allow
Deny from all
<Files ~ “.(xml|css|jpe?g|png|gif|js)$”>
Allow from all
</Files>

7. Protect .htaccess
Hh][Tt][Aa])”>
order allow,deny
deny from all
satisfy all
</Files>

8. Securing wp-includes
# Block the include-only files.
RewriteEngine On
RewriteBase /
RewriteRule ^wp-admin/includes/ – [F,L]
RewriteRule !^wp-includes/ – [S=3]
RewriteRule ^wp-includes/[^/]+\.php$ – [F,L]
RewriteRule ^wp-includes/js/tinymce/langs/.+\.php – [F,L]
RewriteRule ^wp-includes/theme-compat/ – [F,L]

# BEGIN WordPress

9. Help Prevent “Content Scrapers”
RewriteEngine On
#Replace ?mysite\.com/ with your blog url
RewriteCond %{HTTP_REFERER} !^http://(.+\.)?mysite\.com/ [NC]
RewriteCond %{HTTP_REFERER} !^$
#Replace /images/nohotlink.jpg with your “don’t hotlink” image url
RewriteRule .*\.(jpe?g|gif|bmp|png)$ /images/nohotlink.jpg [L]

Make sure to replace “mysite” with your website’s URL and “/images/nohotlink.jpg” to the path of your image.

10. Protect Your WordPress Blog from Script Injections
Options +FollowSymLinks
RewriteEngine On
RewriteCond %{QUERY_STRING} (\<|%3C).*script.*(\>|%3E) [NC,OR]
RewriteCond %{QUERY_STRING} GLOBALS(=|\[|\%[0-9A-Z]{0,2}) [OR]
RewriteCond %{QUERY_STRING} _REQUEST(=|\[|\%[0-9A-Z]{0,2})
RewriteRule ^(.*)$ index.php [F,L]

11. Things to avoid when choosing a password:

Any permutation of your own real name, username, company name, or name of your website.
A word from a dictionary, in any language.
A short password.
Any numeric-only or alphabetic-only password (a mixture of both is best).

12. Change username of “admin.”  and Admin user id 1 to something else

13. Change the table_prefix: Many published WordPress-specific SOL-injection attacks make the assumption that the table_prefix is wp_, the default.
Changing this can block at least some SQL injection attacks.

14. Remove unused themes and inactive plugins from WP-content folder.

15. FTP : When connecting to your server you should use SFTP encryption if your web host provides it.
If you are unsure if your web host provides SFTP or not, just ask them.
Using SFTP is the same as FTP, except your password and other data is encrypted as it transmitted between your computer and your website.
This means your password is never sent in the clear and cannot be intercepted by an attacker.

16. Scan your site frequently.
http://sitecheck.sucuri.net/scanner/

Automatically Backup Your WordPress Site to Google Drive – Version 2

We have released new version(v2) on wp google drive plugin to make back of your wordpress site files to google drive in efeectivemanner.

http://wordpress.org/extend/plugins/wp-google-drive/

Exclusive tutorial on How to Backup your WordPress blog to Google Drive. It is always recommended to backup your WordPress blog, which includes files (themes, plugins etc) and SQL tables (all your blog posts, comments, drafts etc are stored as tables in database).

Whenever your blog is gone (due to unsecured activities or some other reasons), these backups will help to get back your blog. In some cases, using 3rd party plugins and themes can also lead to malfunction of your blog, here also these backups helps to retain back your blog.

Reasons to Backup WordPress Blog to Google Drive

  • Its a Google Product and is free to use up-to 5GB.
  • Can get access to backups on any of the devices like Smartphones, Tablet PC’s, Laptops etc.
  • Backups will be uploaded in quite less time (sometimes based on internet connection also).
  • Highly Secure and reliable service, so there wont be any loss of data in the process.
  • Backups can be shared with your blog partners (if have any) with a single click of mouse

How to Backup WordPress blog to Google Drive

Download and Install Google Drive for WordPress plugin from official WordPress plugin repository.

Google Drive for WordPress Plugin »

Please see the video for plugin process.

Here is the step-by-step guide that helps to backup your WordPress blog to Google Drive. Brief list of things you have to do in this tutorial:

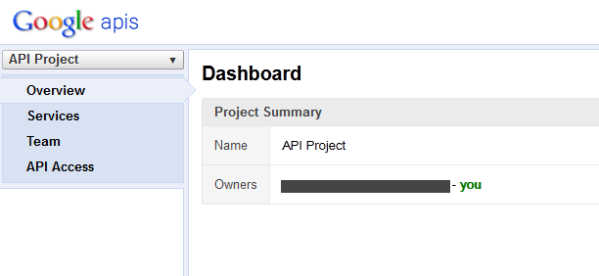
  1. Login to Google API and create a Client ID in it.
  2. Authorizing the Plugin by using Client ID and Client Secret.
  3. Setting up the plugin frequency to take backups.

google-drive-plugin

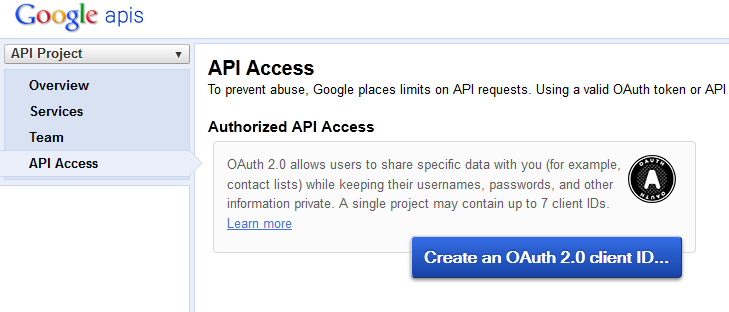
  • Go to “API Access” tab and click on “Create an OAuth 2.0 client ID”

backup-wordpress-blog-google-drive-api-access

backup-wordpress-blog-google-drive-api

  • Go to “API Access” tab and click on “Create an OAuth 2.0 client ID”

google-drive-api-access

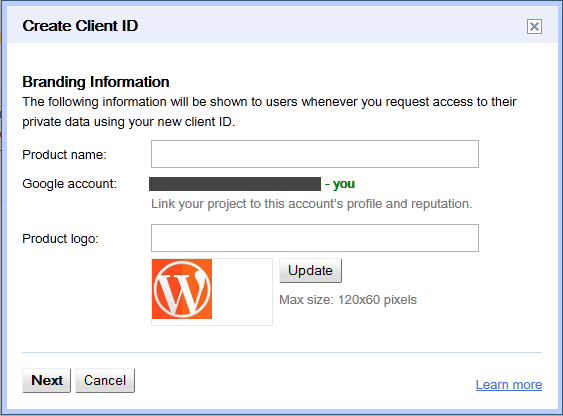
  • In the pop-up window, give a product name and upload logo before clicking on “Next” button.

google-drive-create-client-id

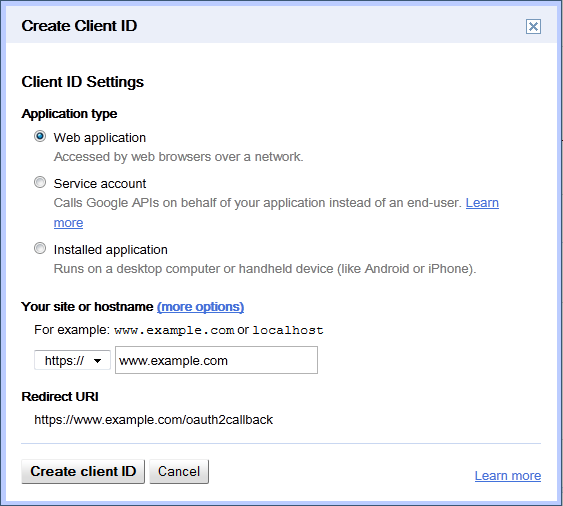
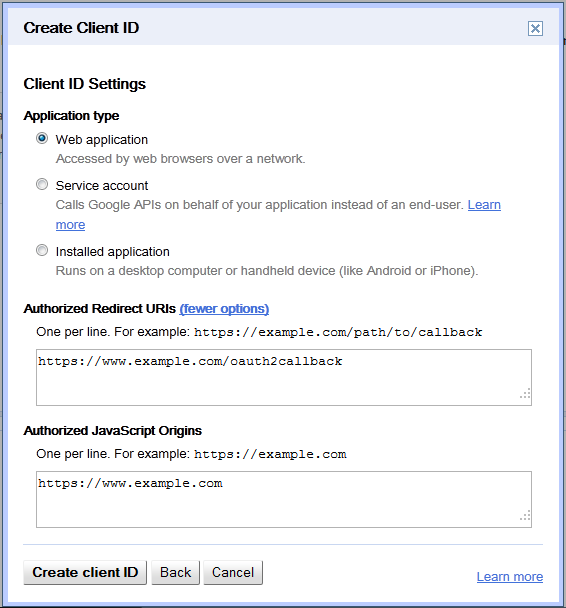
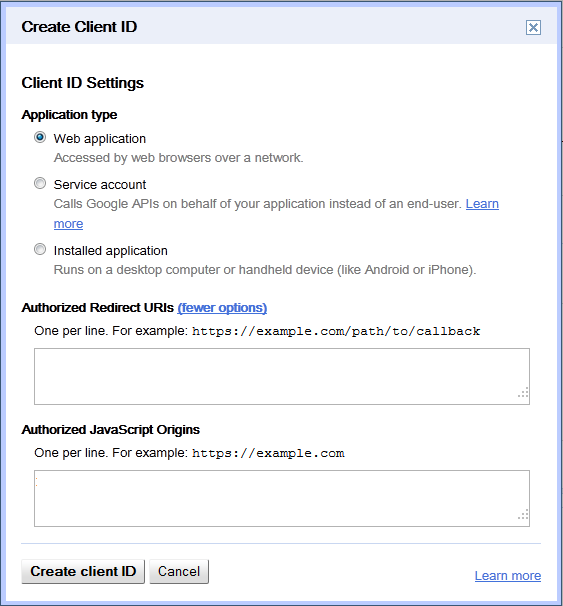
  • By default “Web Application” will be selected and don’t change it.

google-drive-client-settings

  • In “Your site or hostname” section, click on “More Options” to expand link sections.

google-drive-client-id

  • Now, paste the link in the “Backup Settings” page here. Enter domain name in “JavaScripts” origin field.

google-drive-insert-url

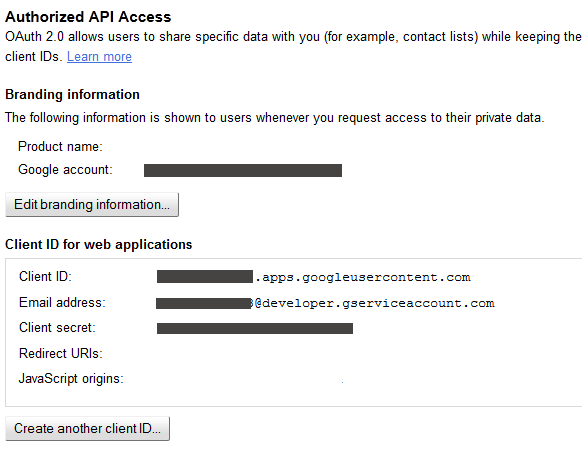
  • Click on “Create Client ID” and you have successfully created a Client ID using Google API Console.

google-drive-dashboard

  • Copy the Client ID and Client Secret from API dashboard and paste them in “Configure Google” page.

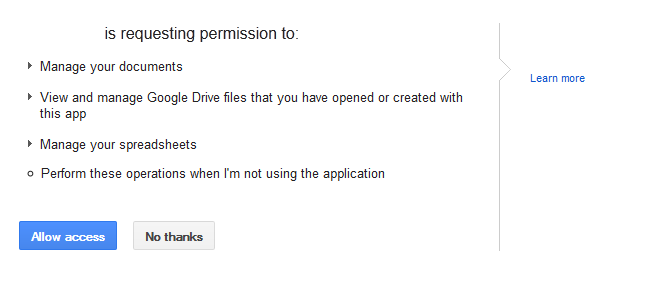
  • You have to authorize the plugin by clicking on “Allow Access” button.

google-drive-permissions

  • Allow Access to the Plugin and the entire setup has been successfully installed.

Check Out : WordPress Plugin

How to automatically Backup WordPress blog to Google Drive

  • Now, you can configure this plugin further by entering the custom folder ID of your Google Drive.
  • Also define the maximum number of backups (use any positive integer in that field).
  • Set the frequency of backup and everything will be automatically stored in your Google Drive.

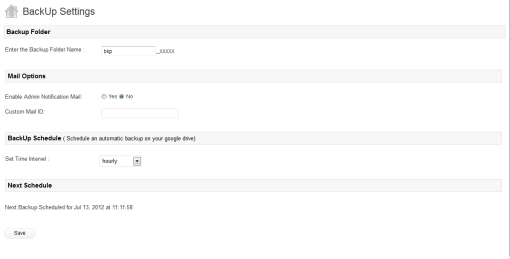
    Backup Settings:

    1. You can name your backup directory, any name you like just enter it on text box.
    2. Mail Options : Enable this option to receive mail notification after successful backup on google drive.
    3. Schedule Backup:You can schedule a backup duration here. Based upon the Scheduled time, it will automatically perform schedule backup to google drive.
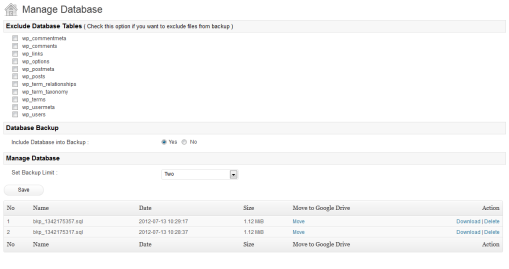
    4. Manage database :
    –Check yes, if you want to keep Database backup
    –Check the option if you want to exclude particular tables from backup
    –Always keep a recent backup of your site.Here you have option to keep most recent backups.
    Select how many you want to maintain on your server.
    –If you want, you can move particular backup folder to google drive.
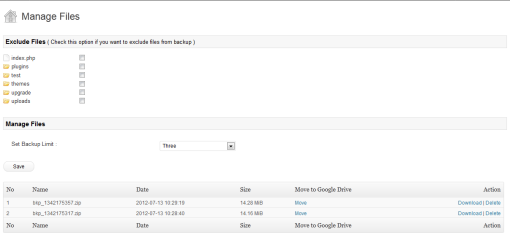
    5. Manage Files:
    –Check option to exclude files from backup
    –Select how many backups you would like to maintain on your server.
    –If you want, you can move particular backup folder to Google drive.
    6. On-time backup: For immediate backup.

    FYI:

    Both schedule backup and Ontime backup will works based upon your files selection on Manage database and Manage Files section.

2011 in review

The WordPress.com stats helper monkeys prepared a 2011 annual report for this blog.

Here’s an excerpt:

The concert hall at the Sydney Opera House holds 2,700 people. This blog was viewed about 9,300 times in 2011. If it were a concert at Sydney Opera House, it would take about 3 sold-out performances for that many people to see it.

Click here to see the complete report.

8-9 Quake Strikes Japan Triggers Tsunami

Japanese television is showing horrific pictures of a wall of water swallowing everything in its path following a massive 8.9 magnitude earthquake struck off the northeast coast of Japan.

The quake has triggered a tsunami already that’s washing away cars and houses inland in the north-east of the country. Television showed cars bobbing in water alongside fishing boats.

A 10-metre tsunami warning has been extended for the coast in the region.

The tsunami warning was issued to most of the Pacific coast of the main island of Honshu, broadcaster NHK reported. People are being told to get to higher ground.

The quake was initially listed as 7.9 magnitude, then upgraded to 8.8, then 8.9 by US Geological Survey. A series of aftershocks followed including one of around 7 magnitude.

The epicentre of the quake is believed to be in the north of Japan, in the Honshu area.

The quake caused buildings to shake in the capital Tokyo, triggering at least one building fire, NHK television and witnesses reported. Around four million homes are without power in Tokyo, and several people have been buried in a landslide.

Many sections of Tohoku expressway serving northern Japan are damaged and there is a major fire at Chiba refinery near Tokyo.

The BBC is reporting it as a “mega-quake”.

Narita airport, Tokyo’s main airport, has been closed. A number of people are believed to have been injured during a graduation ceremony in Tokyo when a roof collapsed.

The public broadcaster showed black smoke billowing from a building in Odaiba, a Tokyo suburb, and bullet trains to the north of the country have been halted.

“The building shook for what seemed a long time and many people in the newsroom grabbed their helmets and some got under their desks,” Reuters correspondent Linda Sieg said.

“It was probably the worst I have felt since I came to Japan more than 20 years ago.”

The US Geological Survey verified a magnitude of 8.8 at depth of 24.3kms and located the quake 130.3kms east of Sendai, Honshu. The stock market extended its losses after the quake.

Japan’s northeast Pacific coast, called Sanriku, has suffered from quakes and tsunamis in the past and a 7.2 quake struck on Wednesday. In 1933, a magnitude 8.1 quake in the area killed more than 3,000 people. Last year fishing facilities were damaged after by a tsunami caused by a strong tremor in Chile.

There are believed to be 3500 New Zealanders in Japan, and 1600 in Tokyo.

Civil Defence in New Zealand says a tsunami is possible in New Zealand, but it is still monitoring the situation and it would be 11 hours away.

WordPress functions.php Template with 15 Essential Custom Functions

When designing WordPress themes, I always add a common set of custom functions to the theme’s functions.php file. This speeds up development time because I don’t have to hunt for and individually copy the same slew of functions for every theme. I just drop in a copy of my functions.php template and build up from there. This takes care of all those little things that always need to be done:

  • Include jQuery
  • Enable threaded comments
  • Add feed links to the header
  • Disable unused widget areas
  • Adding Google Analytics to the footer
  • Stop the “Read More” link from jumping to the middle of the next page 😉

One of the things that I like about these functions is that they’re all so concise, simple, and effective. The functions.php template file currently contains 15 different functions and is a continual work in progress. Not everyone is going to need or use everything in the file, but the idea is to modify this template into something that works for you. It’s a starting point with some really useful functions.

In this DiW article, we first provide an explanation of each of the 15 functions and then bring them all together into the working functions.php template. Just copy and paste the template code at the end of this article or grab a copy of the zipped functions.php file and enjoy a custom collection of functions that will help you optimize your development process while enhancing WordPress with essential functionality.

Add feed links to header

Since version 2.8, WordPress can add all relevant feed links (main, comments, categories, et al) to your <head> area. It doesn’t happen by default, however, because you have to add the following snippet to make it work:

// add feed links to header
if (function_exists('automatic_feed_links')) {
	automatic_feed_links();
} else {
	return;
}

This will check to see if you’re using a version of WordPress that is compatible, and then enable the automatic feed links. A couple of notes: first, this method assumes that you are not manually including any feed links in your <head>. Also, I read a recent Trac ticket that looked like this functionality was being integrated with add_theme_support, so keep your eyes open for that.

Automatic jQuery inclusion

We’ve discussed how to include jQuery the right way by placing a little snippet in your document head, but here is a way to do it from your theme’s functions.php file:

// smart jquery inclusion
if (!is_admin()) {
	wp_deregister_script('jquery');
	wp_register_script('jquery', ("http://ajax.googleapis.com/ajax/libs/jquery/1/jquery.min.js"), false);
	wp_enqueue_script('jquery');
}

This code ensures that only one copy of jQuery is included, and calls it from Google’s servers to save bandwidth and take advantage of any primed caches that happen to be visiting. Note that this function needs to be located before the threaded-comments function in order for it to work.

Enable threaded comments

As we explain in the book, enabling threaded comments requires adding a snippet of code into your <head> area just before the wp_head tag. After a little experimenting, I discovered that you can include this snippet from the functions.php file:

// enable threaded comments
function enable_threaded_comments(){
	if (!is_admin()) {
		if (is_singular() AND comments_open() AND (get_option('thread_comments') == 1))
			wp_enqueue_script('comment-reply');
		}
}
add_action('get_header', 'enable_threaded_comments');

This helps keep your document <head> a little cleaner. Note that this function needs to be located after the jQuery-inclusion function in order for it to work.

Remove unwanted crap from the head section

As we’ve mentioned before, WordPress spits out a ton of crap in the document <head> – stuff like the version number and WLW, RSD, and index links. To clean things up, we add this nice little snippet into the functions.php template:

// remove junk from head
remove_action('wp_head', 'rsd_link');
remove_action('wp_head', 'wp_generator');
remove_action('wp_head', 'feed_links', 2);
remove_action('wp_head', 'index_rel_link');
remove_action('wp_head', 'wlwmanifest_link');
remove_action('wp_head', 'feed_links_extra', 3);
remove_action('wp_head', 'start_post_rel_link', 10, 0);
remove_action('wp_head', 'parent_post_rel_link', 10, 0);
remove_action('wp_head', 'adjacent_posts_rel_link', 10, 0);

Add Google Analytics to the footer

Another annoying task that has to be done for all of the sites I create is adding Google Analytics code to the footer.php file. Recently it occurred to me to just add the code to my functions.php and never worry about it again:

// add google analytics to footer
function add_google_analytics() {
	echo '<script src="http://www.google-analytics.com/ga.js" type="text/javascript"></script>';
	echo '<script type="text/javascript">';
	echo 'var pageTracker = _gat._getTracker("UA-XXXXX-X");';
	echo 'pageTracker._trackPageview();';
	echo '</script>';
}
add_action('wp_footer', 'add_google_analytics');

A couple of notes here: first, obviously you want to replace the “UA-123456-1” with your actual GA code. Second, you may want to check out the three currently available Analytics options and modify the code accordingly. Currently, this function is using the newer “ga.js” tracking code, but that is easily changed to either of the other methods.

Custom excerpt length

Instead of using the default 55-word limit, this function enables you to specify any length for your excerpts.

// custom excerpt length
function custom_excerpt_length($length) {
	return 20;
}
add_filter('excerpt_length', 'custom_excerpt_length');

Just set your preferred number of words by editing the “20” to whatever you wish.

Custom excerpt “continue” string

Or whatever they call that funky bracketed ellipses thing “[...]” that is appended to your post excerpts by default. I like to remove the brackets, but with this functions.php snippet you can change it to anything:

// custom excerpt ellipses for 2.9+
function custom_excerpt_more($more) {
	return '...';
}
add_filter('excerpt_more', 'custom_excerpt_more');

/* custom excerpt ellipses for 2.8-
function custom_excerpt_more($excerpt) {
	return str_replace('[...]', '...', $excerpt);
}
add_filter('wp_trim_excerpt', 'custom_excerpt_more'); 
*/

As you can see, there are two different versions of this code, depending on your version of WordPress. We like to stay current, so we commented out the older method but left it there in case you need it. For either version of this technique, just replace the “...” with “pants on the ground” or whatever happens to suit your needs.

No “more” jumping for the “read more” link

One of the weirdest things that WordPress does is “jump” the reader to the location of the “<!--more-->” tag on the single-post-view when the “read more” link is clicked. It’s just awkward — if the jump was on the same page, it would make sense, but to load a new page and then take the reader halfway down without explaining anything is just wrong. In any case, here is a nice little function that will stop the jumping once and for all:

// no more jumping for read more link
function no_more_jumping($post) {
	return '<a href="'.get_permalink($post->ID).'" class="read-more">'.'Continue Reading'.'</a>';
}
add_filter('excerpt_more', 'no_more_jumping');

Nothing else needs to be done for this to work – just plug it in and enjoy your new “jumpless” functionality. Note that this is also a convenient place to customize the “read more” link with whatever attributes or custom text you wish.

Add a favicon to your blog

You just gotsta have a favicon for your blog, and this code makes it super easy to do. Just create your image and upload to site’s root directory. The following code in your functions.php file makes it so by adding the required line to your <head> area:

// add a favicon to your 
function blog_favicon() {
	echo '<link rel="Shortcut Icon" type="image/x-icon" href="'.get_bloginfo('wpurl').'/favicon.ico" />';
}
add_action('wp_head', 'blog_favicon');

Feel free to change the directory to whatever you desire. Also make sure that the wp_head is present within your theme’s header.php file.

Add a different favicon for your blog’s Admin area

While we’re here, let’s add a unique favicon to our Admin pages, so that they are easier to recognize when bookmarked or working with tabs. Just create a favicon and upload to your theme’s /images/ directory. This code takes care of the rest:

// add a favicon for your admin
function admin_favicon() {
	echo '<link rel="Shortcut Icon" type="image/x-icon" href="'.get_bloginfo('stylesheet_directory').'/images/favicon.png" />';
}
add_action('admin_head', 'admin_favicon');

As before, feel free to change the directory to whatever you desire. It might be best to keep your admin favicon in a separate directory than your blog favicon. Just sayin’.

Custom Admin Login logo

You know that snazzy blue WordPress logo that is branding your various login pages? Yeh, you can change that to whatever you want. Just create your custom login image, name it “custom-login-logo.png”, and upload it to your theme’s /images/ directory. This code will take care of the rest:

// custom admin login logo
function custom_login_logo() {
	echo '<style type="text/css">
	h1 a { background-image: url('.get_bloginfo('template_directory').'/images/custom-login-logo.png) !important; }
	</style>';
}
add_action('login_head', 'custom_login_logo');

The key here is to make sure that the path and image names match that of your setup. Also, when creating your image, you may want to keep in mind the properties of the original: 30px length, 31px height, transparent GIF format, and header background color of #464646 (for the image matte).

Disable unused widget areas

Justin Tadlock shares this handy function for removing unwanted widget areas from our theme – a must for customizing existing themes:

// disable all widget areas
function disable_all_widgets($sidebars_widgets) {
	//if (is_home())
		$sidebars_widgets = array(false);
	return $sidebars_widgets;
}
add_filter('sidebars_widgets', 'disable_all_widgets');

This code is plug-&-play – no other modifications need to be made. Note: if you only want to disable widgets on your Home page, then remove the two comment slashes (“//”) from the third line.

Kill the WordPress update nag

This is one of my favorites, but I know it’s not for everyone. In any case, you know that “Please update now..” message that appears on every page in the WordPress Admin when new versions are available? This sweet little function kills it dead (or disables it, actually):

// kill the admin nag
if (!current_user_can('edit_users')) {
	add_action('init', create_function('$a', "remove_action('init', 'wp_version_check');"), 2);
	add_filter('pre_option_update_core', create_function('$a', "return null;"));
}

Feel free to comment this one out or remove it if you rely on the Admin nag to keep you informed of changes.

Include category ID in body_class and post_class

By default, WordPress body_class and post_class do not include the ID of the category of the current post. This custom function changes all that:

// category id in body and post class
function category_id_class($classes) {
	global $post;
	foreach((get_the_category($post->ID)) as $category)
		$classes [] = 'cat-' . $category->cat_ID . '-id';
		return $classes;
}
add_filter('post_class', 'category_id_class');
add_filter('body_class', 'category_id_class');

Even if you aren’t using it, it’s a nice function to have around, which is why it’s included here for this custom functions.php template of essential functions. Keywords in the house because we can.

Get the first category ID

Another useful function when working with different categories is the ability to get the first category ID of the current post. This function makes it happen:

// get the first category id
function get_first_category_ID() {
	$category = get_the_category();
	return $category[0]->cat_ID;
}

Strictly plug-&-play: just use <?php get_first_category_ID(); ?> in your theme template file to access the data.

Putting it all together..

As promised, here is the full-meal deal – the entire collection neatly organized into a single chunk of code:

<?php // custom functions.php template @ digwp.com

// add feed links to header
if (function_exists('automatic_feed_links')) {
	automatic_feed_links();
} else {
	return;
}


// smart jquery inclusion
if (!is_admin()) {
	wp_deregister_script('jquery');
	wp_register_script('jquery', ("http://ajax.googleapis.com/ajax/libs/jquery/1/jquery.min.js"), false, '1.3.2');
	wp_enqueue_script('jquery');
}


// enable threaded comments
function enable_threaded_comments(){
	if (!is_admin()) {
		if (is_singular() AND comments_open() AND (get_option('thread_comments') == 1))
			wp_enqueue_script('comment-reply');
		}
}
add_action('get_header', 'enable_threaded_comments');


// remove junk from head
remove_action('wp_head', 'rsd_link');
remove_action('wp_head', 'wp_generator');
remove_action('wp_head', 'feed_links', 2);
remove_action('wp_head', 'index_rel_link');
remove_action('wp_head', 'wlwmanifest_link');
remove_action('wp_head', 'feed_links_extra', 3);
remove_action('wp_head', 'start_post_rel_link', 10, 0);
remove_action('wp_head', 'parent_post_rel_link', 10, 0);
remove_action('wp_head', 'adjacent_posts_rel_link', 10, 0);


// add google analytics to footer
function add_google_analytics() {
	echo '<script src="http://www.google-analytics.com/ga.js" type="text/javascript"></script>';
	echo '<script type="text/javascript">';
	echo 'var pageTracker = _gat._getTracker("UA-XXXXX-X");';
	echo 'pageTracker._trackPageview();';
	echo '</script>';
}
add_action('wp_footer', 'add_google_analytics');


// custom excerpt length
function custom_excerpt_length($length) {
	return 20;
}
add_filter('excerpt_length', 'custom_excerpt_length');


// custom excerpt ellipses for 2.9+
function custom_excerpt_more($more) {
	return '...';
}
add_filter('excerpt_more', 'custom_excerpt_more');

/* custom excerpt ellipses for 2.8-
function custom_excerpt_more($excerpt) {
	return str_replace('[...]', '...', $excerpt);
}
add_filter('wp_trim_excerpt', 'custom_excerpt_more'); 
*/


// no more jumping for read more link
function no_more_jumping($post) {
	return '<a href="'.get_permalink($post->ID).'" class="read-more">'.'Continue Reading'.'</a>';
}
add_filter('excerpt_more', 'no_more_jumping');


// add a favicon to your 
function blog_favicon() {
	echo '<link rel="Shortcut Icon" type="image/x-icon" href="'.get_bloginfo('wpurl').'/favicon.ico" />';
}
add_action('wp_head', 'blog_favicon');


// add a favicon for your admin
function admin_favicon() {
	echo '<link rel="Shortcut Icon" type="image/x-icon" href="'.get_bloginfo('stylesheet_directory').'/images/favicon.png" />';
}
add_action('admin_head', 'admin_favicon');


// custom admin login logo
function custom_login_logo() {
	echo '<style type="text/css">

	h1 a { background-image: url('.get_bloginfo('template_directory').'/images/custom-login-logo.png) !important; }
	</style>';
}
add_action('login_head', 'custom_login_logo');


// disable all widget areas
function disable_all_widgets($sidebars_widgets) {
	//if (is_home())
		$sidebars_widgets = array(false);
	return $sidebars_widgets;
}
add_filter('sidebars_widgets', 'disable_all_widgets');


// kill the admin nag
if (!current_user_can('edit_users')) {
	add_action('init', create_function('$a', "remove_action('init', 'wp_version_check');"), 2);
	add_filter('pre_option_update_core', create_function('$a', "return null;"));
}


// category id in body and post class
function category_id_class($classes) {
	global $post;
	foreach((get_the_category($post->ID)) as $category)
		$classes [] = 'cat-' . $category->cat_ID . '-id';
		return $classes;
}
add_filter('post_class', 'category_id_class');
add_filter('body_class', 'category_id_class');


// get the first category id
function get_first_category_ID() {
	$category = get_the_category();
	return $category[0]->cat_ID;
}

?>

Download the custom functions.php template file

If you prefer, you can download this code in a ready-to-go functions.php file in zipped format:

Download zipped functions.php Template File

Source:

Digging into wordpress

10 Ways to Create a Mobile Friendly WordPress Site

Nowadays, it is a trend to visit a website from mobile devices. So it is essential to create a mobile friendly version of your WordPress site. Here are some ways for you to create a mobile friendly version of your WordPress blog for your users and for yourself.

Chicago, IL — (SBWIRE) — 05/13/2010 — Mobile technology is going big. Every other user is now viewing your website from their iPhone or other smart phones. It is essential that you create a mobile friendly version of your WordPress site. Majority of top sites and blogs have already made their sites mobile friendly, but there are tons of other sites and blogs that lacks a mobile friendly version. In this article, we will share some ways you can create a mobile friendly version of your WordPress blog for your users and for yourself.

For Users

In this section we will share all the ways that will create a mobile friendly version of WordPress for your users.

1. WPtap is a WordPress specialist in developing mobile themes/plugins that can instantly convert your WordPress site into web-application experience when viewed from iPhone, iPod Touch, touch-based Blackberry, and Android smartphones.

WPtap offers both free and paid themes.4 fine-designed themes are available at WPtap: Tap News (iPhone App style mobile theme); Video Tube ( for video blogging and content sharing on mobile site); News Gallery(for image-centric and magazine style WordPress websites); News Press(for News, Blog, and other text-centric WordPress sites).

WPtap Pages is another advanced new design from WPtap.With features like elegant slideshow and thumbnail images, it makes a perfect choice for directory listing and product showcases.

They also provide theme customization service for users. So far, they have got a lot of positive feedback from customers. (http://www.wptap.com/)

2. Mofuse has a free option to make your blog mobile friendly for various devices including, iPhone, Android, Blackberry and others. Top blogs like Mashable, Readwriteweb, Makeuseof are using Mofuse. Mofuse displays your RSS Feeds to your users. Their free option does not give you enough freedom which is why we did not use their service, but it is very easy to setup. They also have a WordPress Mofuse Plugin.

3. WordPress Mobile Edition is a plugin by Crowd Favorite. This plugin shows an interface designed for a mobile device when visitors come to your site on a mobile device. Mobile browsers are automatically detected, the list of mobile browsers can be customized on the settings page.

4. WPTouch is a mobile plugin/theme for your WordPress website. It automatically transforms your WordPress blog into a web-application experience when viewed from an iPhoneTM, iPod touchTM, AndroidTM, or BlackBerry StormTM touch mobile device. WPTouch has a very good admin options panel. Make sure you check out their gallery for screenshots.

5. WordPress Mobile Pack is a complete toolkit to help mobilize your WordPress site and blog. It includes a mobile switcher to select themes based on the type of user that is visiting the site, a selection of mobile themes, extra widgets, device adaptation and a mobile administration panel to allow users to edit the site or write new posts when out and about.

6. MobilePress is a free WordPress plugin which turns your WordPress blog into a mobile friendly blog when viewed on a cell phone. MobilePress also allows you to create custom mobile themes for different handheld devices and mobile browsers such as the iPhone, Opera Mini and Windows Mobile.

For Administrators

In this section, we will share how you can create a mobile friendly WordPress Admin Panel for administrators (you). This will allow you to manage comments and create new posts using your mobile device.

7. WordPress for iPhone is the official iPhone app that lets you write posts, upload photos, edit pages, and manage comments on your blog from your iPhone or iPod touch. With support for both WordPress.com and self-hosted WordPress (2.7 or higher), users of all experience levels can get going in seconds.

8. WordPress for Blackberry is the official WordPress for BlackBerry app allows you to write posts, upload photos and videos, edit pages, and manage comments. Both WordPress.com and self-hosted WordPress (2.7 or higher) sites are supported.

9. WordPress for Android is the official WordPress for Android is an Open Source app that empowers you to write new posts, edit content, and manage comments with built-in notifications. Download it now and get blogging in no time.

10. WPhone creates the option to use a custom admin interface designed for mobile phones. It has two options called Rich and Lite. Rich option is designed for the iPhone / iPod Touch and other phones supporting full Javascript and CSS featuring fancy AJAX and sliding menus. Lite option is a lightweight, simple version designed for all other phone types (no Javascript or anything else required).

The above are the top 10 great ways to create a mobile friendly WordPress website. Each has their special traits. Personally, I prefer to WPtap. It is really a professional team in designing mobile themes.

10 Exceptional WordPress Hacks

One of the reasons people love WordPress so much is its great flexibility. You can change the software’s appearance with themes. You can enhance its functionality with plug-ins. And, last but not least, you can totally unleash WordPress’ power with hacks. Some time ago, we wrote a post showing 10 Killer WordPress Hacks.

Today, let’s do it again with 10 new and totally killer WordPress hacks to make your blog stand out from the crowd. As usual, we won’t just list the hacks alone. In each entry, you’ll find an explanation of the code as well as the kinds of problems that the hack solves.

You may be interested in the following related posts:

[By the way: The network tab (on the top of the page) is updated several times a day. It features selected articles from the best web design blogs!]

1. Create TinyURLs On The Fly

Sm1 in 10 Exceptional WordPress Hacks

The problem. Because Twitter has become a social media revolution, many bloggers and Twitter users enjoy sharing blog posts they have found and liked on Twitter. However, manually creating a TinyURL before tweeting can get a little tedious. As you probably know, Twitter can bring a lot of traffic to your blog, so it is in your interest to consistently provide short URLs to your readers.

The solution. To use this recipe, follow the simple steps below:

  1. Open your functions.php file.
  2. Paste the following code in the file:
    function getTinyUrl($url) {
        $tinyurl = file_get_contents("http://tinyurl.com/api-create.php?url=".$url);
        return $tinyurl;
    }
  3. Open your single.php file and paste the following in the loop:
    <?php
    $turl = getTinyUrl(get_permalink($post->ID));
    echo 'Tiny Url for this post: <a href="'.$turl.'">'.$turl.'</a>'
    ?>
  4. That’s all you need. Each of your posts now has its own TinyURL, ready for tweeting!

Code explanation. The popular URL shortening service TinyURL provides a quick API that creates TinyURLs on the fly. When you pass a URL to http://tinyurl.com/api-create.php, the API immediately prints the related TinyURL on the screen.

Using the PHP function file_get_contents(), we can get it and assign it to the $tinyurl variable. The last part of the code retrieves the post’s permalink and passes it as a parameter to the getTinyUrl() function previously created.

Source:

2. List Upcoming Posts

Sm8 in 10 Exceptional WordPress Hacks

The problem. If you often schedule posts to be published, how about displaying them in a list? This will make your readers look forward to what you’re going to publish in a few days and can help you reach new RSS subscribers. Implementing this functionality on your WordPress blog isn’t hard at all.

The solution. Nothing hard here. Just copy this code and paste it anywhere in your theme files.

<div id="zukunft">

	<div id="zukunft_header"><p>Future events</p></div>

	<?php query_posts('showposts=10&post_status=future'); ?>
	<?php if ( have_posts() ) : while ( have_posts() ) : the_post(); ?>
		<div >

			<p class><b><?php the_title(); ?></b><?php edit_post_link('e',' (',')'); ?><br />

			<span class="datetime"><?php the_time('j. F Y'); ?></span></p>
		</div>

	<?php endwhile; else: ?><p>No future events scheduled.</p><?php endif; ?>

</div>

Once you’ve saved the file, your upcoming posts will be displayed on your blog.

Code explanation. This code use the super-powerful query_posts() WordPress function, which allows you to take control of the WordPress loop.

The parameter used is post_status, which allows you to get posts according to their status (published, draft, pending or future). The showposts parameter is also used to define how many items you’d like to get. You can change the value of this parameter on line 4 to retrieve more or less than ten posts.

Source:

3. Create A “Send To Facebook” Button

Sm2 in 10 Exceptional WordPress Hacks

The problem. In the first hack, we noted that Twitter can bring a lot traffic to your blog. Another website that can boost your traffic stats easily is Facebook. In this hack, let’s see how we can create a “Send to Facebook” button for your WordPress blog.

The solution.

  1. Open the single.php file in your theme.
  2. Paste the following code in the loop:
    <a href="http://www.facebook.com/sharer.php?u=<?php the_permalink();?>&t=<?php the_title(); ?>" target="blank">Share on Facebook</a>
  3. Alternatively, you could use the getTinyUrl() function to send a short URL to Facebook:
    <?php $turl = getTinyUrl(get_permalink($post->ID)); ?>
    
    <a href="http://www.facebook.com/sharer.php?u=<?php echo $turl;?>&t=<?php the_title(); ?>" target="blank">Share on Facebook</a>
  4. That’s all. Your readers will now be able to share your blog post on Facebook with their friends!

Code explanation. This useful hack is very easy to understand: the only thing we do here is retrieve the post’s permalink and title and send them as parameters to http://www.facebook.com/sharer.php.

In the alternative method, we used the getTinyUrl() function (created in the previous hack) to send a short URL instead of the post’s permalink.

Source:

4. Create A Maintenance Page For Your WordPress Blog

Sm3 in 10 Exceptional WordPress Hacks

The problem. One thing I really like about Drupal is the option to temporarily redirect visitors to a maintenance page. Sadly, WordPress doesn’t have this feature. When you upgrade your blog, switch themes or make design changes, you may not want your visitors to see your blog as it is being tweaked, especially if it has design or code problems or, even worse, security gaps.

The solution. To solve this problem, we use the power of the .htaccess file. Just follow the steps below to get started.

  1. Create your maintenance page. A simple WordPress page is generally sufficient.
  2. Find your .htaccess file (located at the root of your WordPress installation) and create a back-up.
  3. Open your .htaccess file for editing.
  4. Paste the following code:
    RewriteEngine on
    RewriteCond %{REQUEST_URI} !/maintenance.html$
    RewriteCond %{REMOTE_ADDR} !^123\.123\.123\.123
    RewriteRule $ /maintenance.html [R=302,L]
  5. Replace 123\.123\.123\.123 on line 3 with your IP address (Don’t know it?). Make sure to use the same syntax.
  6. Now, all visitors except you will be redirected to your maintenance page.
  7. Once you’re done tweaking, upgrading, theme switching or whatever, re-open your .htaccess file and remove (or comment out) the redirection code.

Code explanation. The .htaccess file, which controls the Apache Web server, is very useful for these kinds of tasks.

In this example, we state that any visitor who has an IP different from 123.123.123.123 (which doesn’t request maintenance.html) should be redirected to maintenance.html.

By replacing 123.123.123.123 with your own IP address, you make sure you’re still allowed to browse your blog normally, while others are redirected to maintenance.html.

Source:

5. Display Related Posts Without A Plug-In

Sm4 in 10 Exceptional WordPress Hacks

The problem. One well-known way of keeping visitors on your blog longer and helping them discover news posts is to display, usually at the end of the article, a list of related content.

Many plug-ins will do this job, but why not super-charge your theme by integrating this functionality by default?

The solution.

  1. Open the single.php file in your theme.
  2. Paste the following code in the loop:
    <?php
    //for use in the loop, list 5 post titles related to first tag on current post
    $tags = wp_get_post_tags($post->ID);
    if ($tags) {
      echo 'Related Posts';
      $first_tag = $tags[0]->term_id;
      $args=array(
        'tag__in' => array($first_tag),
        'post__not_in' => array($post->ID),
        'showposts'=>5,
        'caller_get_posts'=>1
       );
      $my_query = new WP_Query($args);
      if( $my_query->have_posts() ) {
        while ($my_query->have_posts()) : $my_query->the_post(); ?>
    
          <p><a href="<?php the_permalink() ?>" rel="bookmark" title="Permanent Link to <?php the_title_attribute(); ?>"><?php the_title(); ?></a></p>
          <?php
        endwhile;
      }
    }
    ?>
  3. Save the file, and then have a look at your blog: related posts are automatically displayed!

Code explanation. This hack uses tags to retrieve related posts. The first thing it does is get the post’s tags. If a post has tags, the first one is extracted and used in a query that retrieves posts with the same tag.

By default, this code displays up to five related posts. To change this number, simply edit line 9 of the code.

Source:

6. Automatically Retrieve The First Image From Posts On Your Home Page

Sm5 in 10 Exceptional WordPress Hacks

The problem. Many WordPress users use custom fields to display a thumbnail on their blog home page. Of course, this is a nice solution, but how about automatically retrieving the first image from a post and using it as a thumbnail?

The solution. This hack is quite easy to implement:

  1. Open the functions.php file in your theme.
  2. Paste this code in. Don’t forget to specify a default image on line 10 (in case a post of yours does not have an image).
    function catch_that_image() {
      global $post, $posts;
      $first_img = '';
      ob_start();
      ob_end_clean();
      $output = preg_match_all('/<img.+src=[\'"]([^\'"]+)[\'"].*>/i', $post->post_content, $matches);
      $first_img = $matches [1] [0];
    
      if(empty($first_img)){ //Defines a default image
        $first_img = "/images/default.jpg";
      }
      return $first_img;
    }
  3. Save the functions.php file.
  4. On your blog home page (index.php), call the function this way to get the URL of the first image from the post:
    <?php echo catch_that_image() ?>

Code explanation. The function uses the global variable $post to parse the post’s content with a regular expression. If an image is found, its URL is returned by the function. If not, the default image URL is returned.

Source:

7. Resize Images On The Fly

Sm6 in 10 Exceptional WordPress Hacks

The problem. When you use thumbnails on your blog’s home page or even images in posts, having to manually resize them is boring and wastes a lot of time. So, why not use the power of PHP to do it?

The solution. To achieve this hack, just follow these simple steps:

  1. Get this script and save it on your computer (I’ll assume you’ve named it timthumb.php).
  2. Use an FTP program to connect to your server and create a new directory called scripts. Upload the timthumb.php file to it.
  3. Once done, you can display images like so:
    <img src="/scripts/timthumb.php?src=/images/whatever.jpg&h=150&w=150&zc=1" alt="Screenshot" />

    In other words, you just call the timthumb.php file and pass your image as a parameter. The same goes for your desired width and height.

Code explanation. The timthumb.php script use the PHP GD library, which allows you to manipulate images dynamically with PHP. GD is installed by default on all servers running PHP5. If you’re not running PHP5, you’ll have to check if GD is installed before using this script.

The timthumb.php file gets the parameters you’ve passed to it (image URL, width and height) and uses it to create a new image with your stated dimensions. Once that’s done, the image is returned to you.

Source:

8. Get Your Most Popular Posts Without A Plug-In

Sm7 in 10 Exceptional WordPress Hacks

The problem. Displaying your most popular posts is a good way to make visitors stay longer on your blog, as is displaying related posts. Many great plug-ins can list your most popular posts, but again, why use a plug-in when you can simply hack your WordPress theme to do it automatically?

The solution. Just paste the following code anywhere in your theme files (for example, in sidebar.php). To change the number of displayed posts, simply change the “5″ on line 3 to your desired number.

<h2>Popular Posts</h2>

<ul>
<?php $result = $wpdb->get_results("SELECT comment_count,ID,post_title FROM $wpdb->posts ORDER BY comment_count DESC LIMIT 0 , 5");
foreach ($result as $post) {
setup_postdata($post);
$postid = $post->ID;
$title = $post->post_title;
$commentcount = $post->comment_count;
if ($commentcount != 0) { ?>

<li><a href="<?php echo get_permalink($postid); ?>" title="<?php echo $title ?>">

<?php echo $title ?></a> {<?php echo $commentcount ?>}</li>
<?php } } ?>

</ul>

Code explanation. This code executes an SQL query to the WordPress database, using the $wpdb object, to get a list of the five posts with the most comments. The results are then wrapped in an unordered HTML list and displayed on screen.

Source:

9. Highlight Searched Text In Search Results

Sm9 in 10 Exceptional WordPress Hacks

The problem. The WordPress search engine system is often criticized for not being powerful enough. One of its weakest points in my opinion is that searched text is not easily distinguishable from the rest of the text. Let’s solve that!

The solution.

  1. Open your search.php file and find the the_title() function.
  2. Replace it with the following:
    echo $title;
  3. Now, just before the modified line, add this code:
    <?php
    	$title 	= get_the_title();
    	$keys= explode(" ",$s);
    	$title 	= preg_replace('/('.implode('|', $keys) .')/iu',
    		'<strong class="search-excerpt"></strong>',
    		$title);
    ?>
  4. Save the search.php file and open style.css. Add the following line to it:
    strong.search-excerpt { background: yellow; }

That’s all. Better, isn’t it?

Code explanation. Once again, regular expressions are a lifesaver. The regexp parses the $s content ($s is the variable containing the searched text) and automatically adds a <strong class=”search-excerpt”> element around any occurrences of $s.

Then, you simply modify your style.css file to give searched text a special style and make it more visible to your readers.

Sources:

10. Disable Widgetized Areas Without Editing Theme Files

Sm10 in 10 Exceptional WordPress Hacks

The problem. Widgets are very useful, but sometimes you don’t need them on a particular page or post. Sure, you can create a page template for a particular page or even remove the widgetized zone from the code, but a much better and more elegant solution exists.

The solution. To do this, simply add the following code to your functions.php file:

<?php
add_filter( 'sidebars_widgets', 'disable_all_widgets' );

function disable_all_widgets( $sidebars_widgets ) {
	if ( is_home() )
		$sidebars_widgets = array( false );
	return $sidebars_widgets;
}
?>

Code explanation. This code first adds a filter to the sidebars_widgets WordPress function. Now every time WordPress tries to execute this function, it will execute the disable_all_widgets function we just created.

The disable_all_widgets function uses WordPress conditional tags (in this example, is_home(), but you can use any conditional tag) to disable all widgets if a visitor is on a particular page or post.

Source:

63 Essential WordPress Hacks, Tutorials, Help Files and Cheats

This is a fairly comprehensive list of the Best WordPress Tutorials, Hacks, Help Files and Cheat Sheets (call it what you like).They are written to make life easier, to help us expand WordPresses functionality, to give us a better understanding of WordPress and how powerful a tool it is.

Make sure you thank all the authors of these Tutorials, Hacks, Help Files and Cheat Sheets…

WordPress Tutorials/Hacks

1.WordPress Theme Hacks (Source: Web Designer Wall)

2. No More CSS Hacks (Source: Style Gala)

3. Create a Dynamic Sticky (Source: Maxpower)

4. Styling Individual Posts Using the_ID (Source: WP Designer)

5. Show Category Images (Source: JTPratt)

6. Separate WordPress Comments and Trackbacks (Source: Hack WordPress)

7. Customize your WordPress Login (Source: David Airey)

8. Date Image Hack (Source: YugaTech)

9. How to place a login form in the sidebar (Source: WP Designer)

10. WP: KeyBoard Shortcuts (Source: Tip Monkies)

11. Making Better Use of Your Error “404″ Page (Source: Hack WordPress)

12. Customize Your 404 Page (Source: Theme Playground)

13. WordPress accessibility hacks (Source: Bruce Lawson)

14. Reset your Lost WordPress Administrator Password (Source: Village Idiot)

15. The Definitive Guide to Semantic Web Markup for Blogs (Source: Pearsonified)

16. Do-It-Yourself WordPress Hover Menu (Pop-Up) (Source: WP Designer)

17. How to Protect CSS Mods for ANY WordPress Theme (Source: Pearsonified)

18. WP Contact Manager (Source: Design Canopy)

19. WordPress and the custom fields, a overlooked feature (Source: Gate 303)

20. DiggProof your WordPress (Source: Circle Six Blog)

21. WordPress Ajax Commenting revisited (Source: Zeo)

22. Widgetizing Themes (Source: Automattic)

23. Cloaking to Stop Scraping (Source: Plagiarism Today)

24. Server load button for blogs (Source: Jesse Chilcott’s Journal)

25. Giving each WordPress post a thumbnail, and display the thumbnail on the home page (Source: WordPress Garage)

26. How to create overlapping tabs (Source: WP Designer)

27. How to Optimize Your WordPress Title (Source: Hack WordPress)

28. Blocking Your WordPress Categories and Archives From Google (Source: Hack WordPress)

29. Adding An Author Page To Your WordPress Blog (Source: Hack WordPress)

30. Make a Mobile Friendly Version of your Blog with Google Reader (Source: Digital Inspiration)

31. How to Use WordPress as a Membership Directory (Source: WP Designer)

32. How to Format Images for Feed Readers (Source: Pearsonified)

33. Add Del.icio.us Daily Blog Posting To Your WordPress Blog (Source: Hack WordPress)

34. Huge Compilation of WordPress Code (Source: Hack WordPress)

35. 4 Simple ways to Speed up WordPress (Source: WP Candy)

36. WordPress Date Button (Source: WP Designer)

37. Wicked WordPress Archives in One Easy Step! (Source: Pearsonified)

38. Make Yourself Available to Readers with a Contact Form (Source: Hack WordPress)

39. WordPress as a CMS – Content Management System (Source: Graphic Design Blog)

40. Installing Xampp and WordPress (Locally) (Source: Tamba 2)

41. WordPress Category Page Hacks (Source: Jehiah)

42. 3 WordPress Hacks For SE-Friendly Blog Archives (Source: SEO Egghead)

43. Opening Links in New Windows (Source: Ajay)

44. WordPress Thumbnail Size Limit Hack (Source: Lorelle on WordPress)

45. Restore your WordPress Database (Source: Tamba 2)

46. Validating WordPress (Source: WordPress Codex)

47. Backing Up WordPress (Source: Lorelle on WordPress)

48. Moving Your WordPress Blog to a New Directory (Source: Big Biz Blog)

49. Moving Your WordPress Blog to a New Directory (Source: Big Biz Blog)

WordPress Video Tutorials

50. The Best WordPress Plug-ins

51. How to embed YouTube Video in WordPress

52. How to Upgrade WordPress

53. Make Your WordPress Blog Search Engine Friendly

54. WordPress.com – Step-by-Step Tutorial on How to Blog

55. How To Create A Custom WordPress Page Template

56. WordPress tutorial–installing on a local server

57. Recover WordPress Password When You Have Forgotten It

58. WordPress Tutorial – Edit a Sidebar File Using a Text Editor

59. WordPress Tutorial – Make Menus of Links With the Blogroll 2

60. How-to: Use WordPress/PodPress to podcast to iTunes

61. How to Put Adsense on Your WordPress Blog

WordPress Podcasts

62. The WordPress Podcast

63. The WordPress Weekly